

What this guide covers
Adding products to Square is straightforward, but a few settings are easy to miss, especially if you plan to sell on Square Online. It’s one of the most common things our new clients ask us to help with, so this guide walks through how to add products in Square from start to finish.
By the end you’ll have a category, a product with a photo and price, sales tax and inventory set up, and size variations that each track their own price and stock. The example is a clothing store selling a Classic Shirt, but the same steps work for any physical product. Square keeps all your products in one Item library, and you choose which channels sell them, such as your point of sale or Square Online. So this guide works whether you sell in person, online, or both.
Step 1: Create a product category in Square
Set up your categories before you add products, so everything stays organized as the store grows. Categories also make it easier for customers to find what they’re looking for. A clothing store might have shirts, pants and accessories.
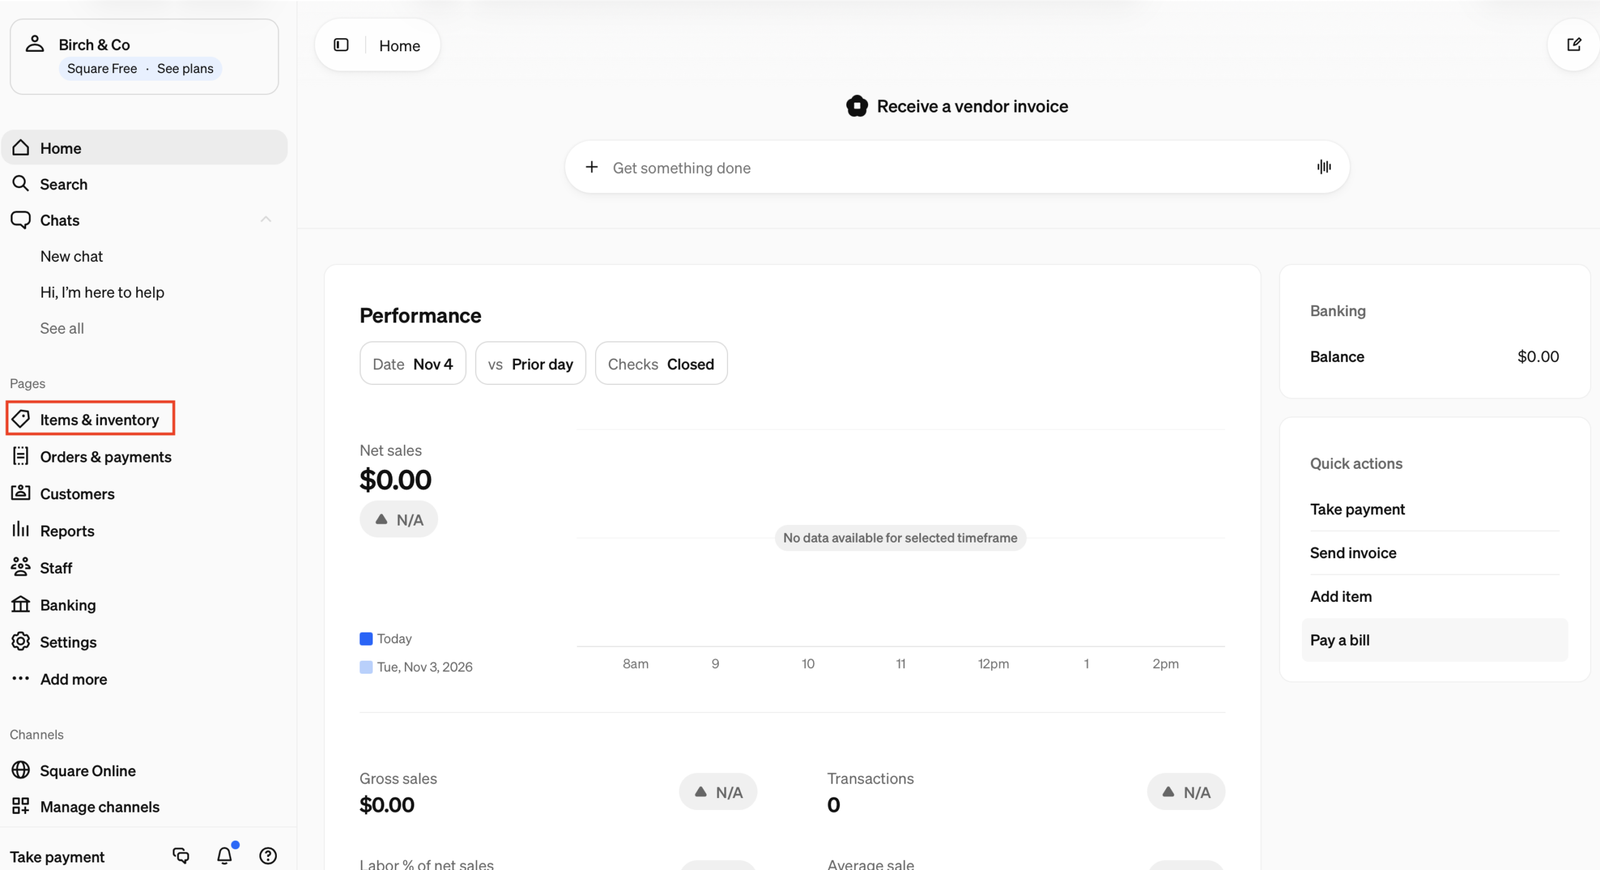
1. In the Square Dashboard, open Items & inventory in the left-hand menu.
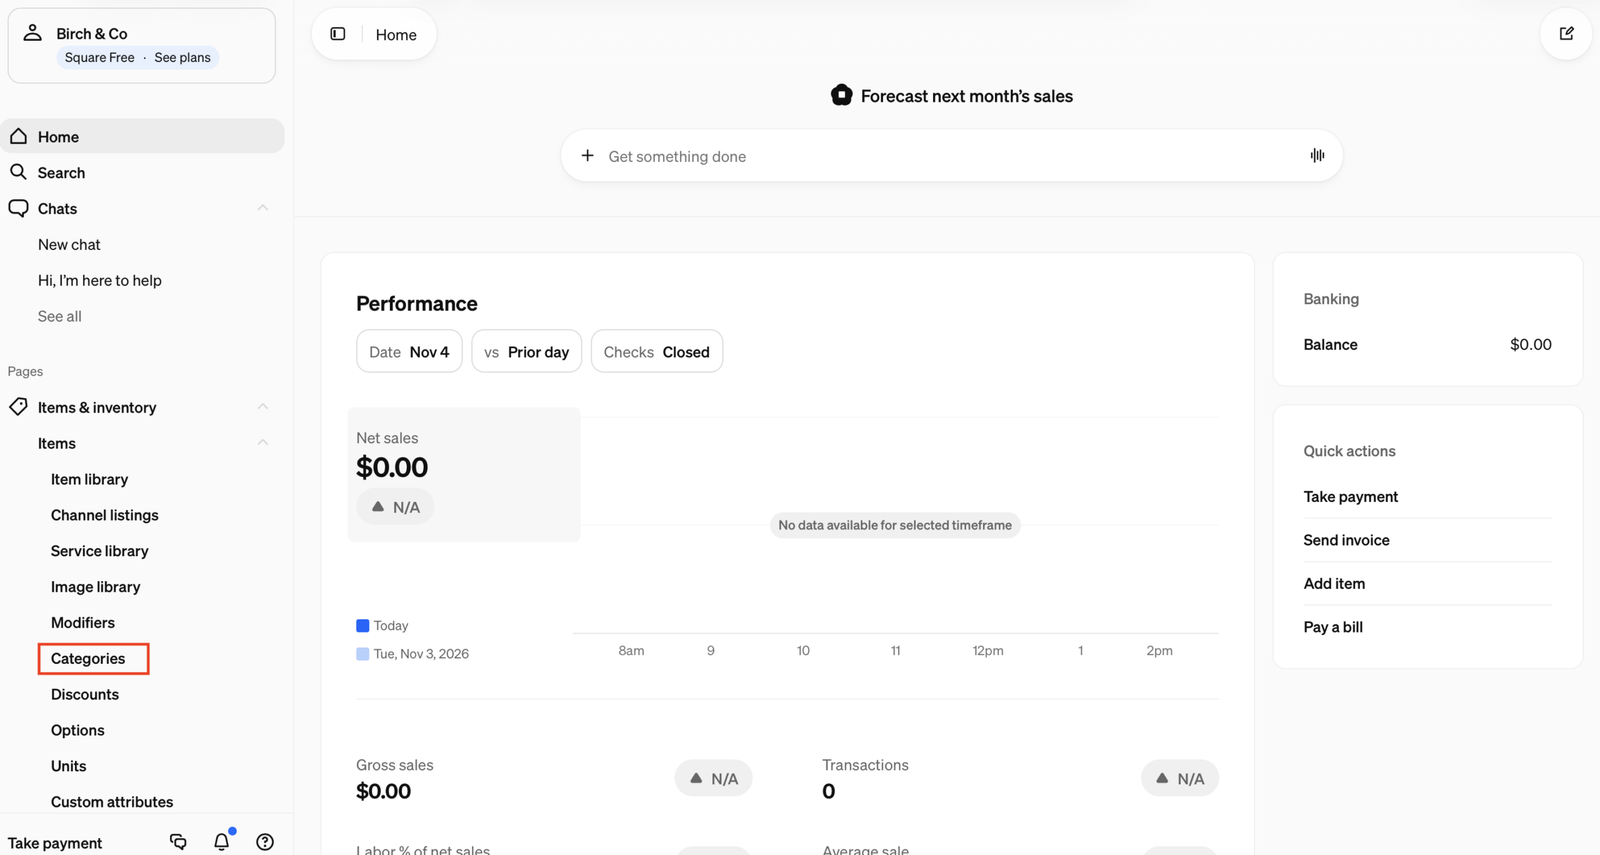
2. Expand the Items section, then select Categories.
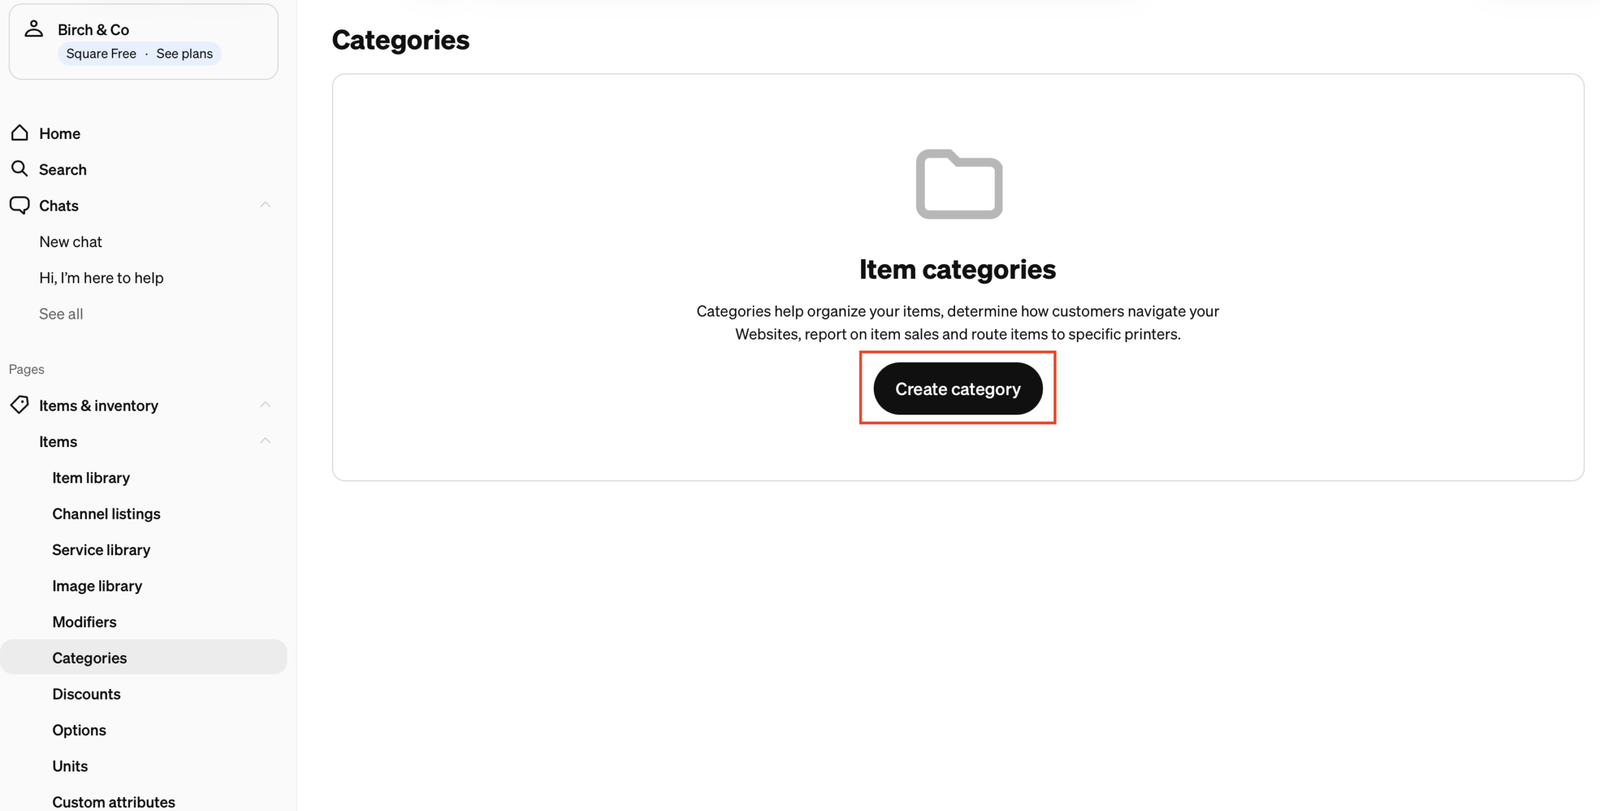
3. Click Create category.
4. Give the category a name. We’ll use Shirts. You’ll also see options to upload an image, pick a parent category to make it a subcategory, and assign items. You don’t need all of them yet.
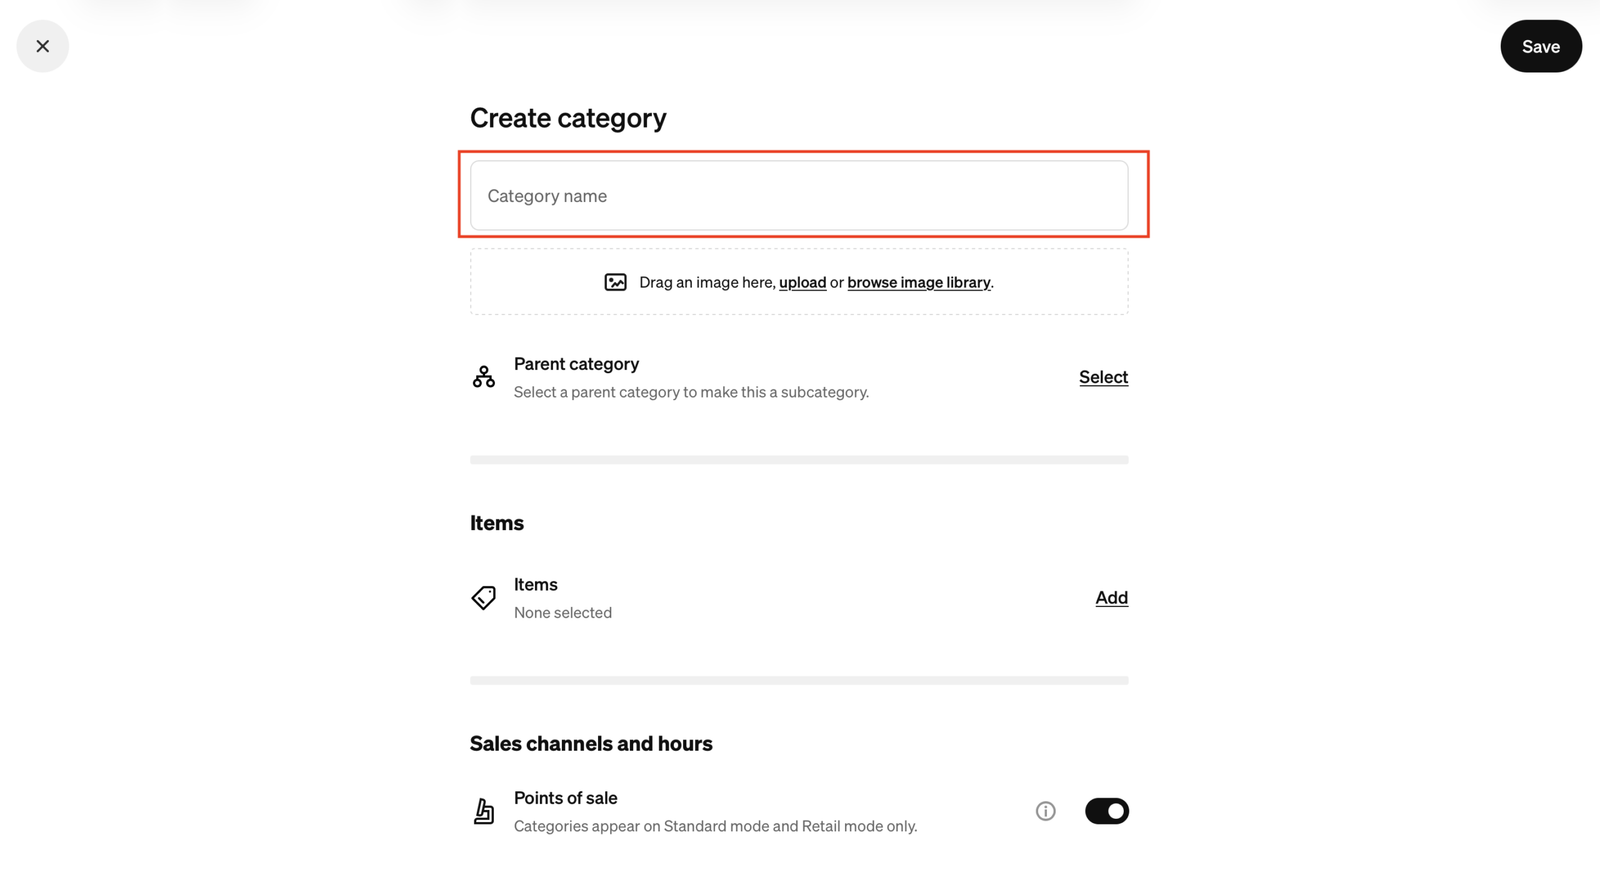
5. Optionally, upload a category image. It’s not required, but a good photo makes the store look more professional, especially if categories show on your website.
6. Click Save.
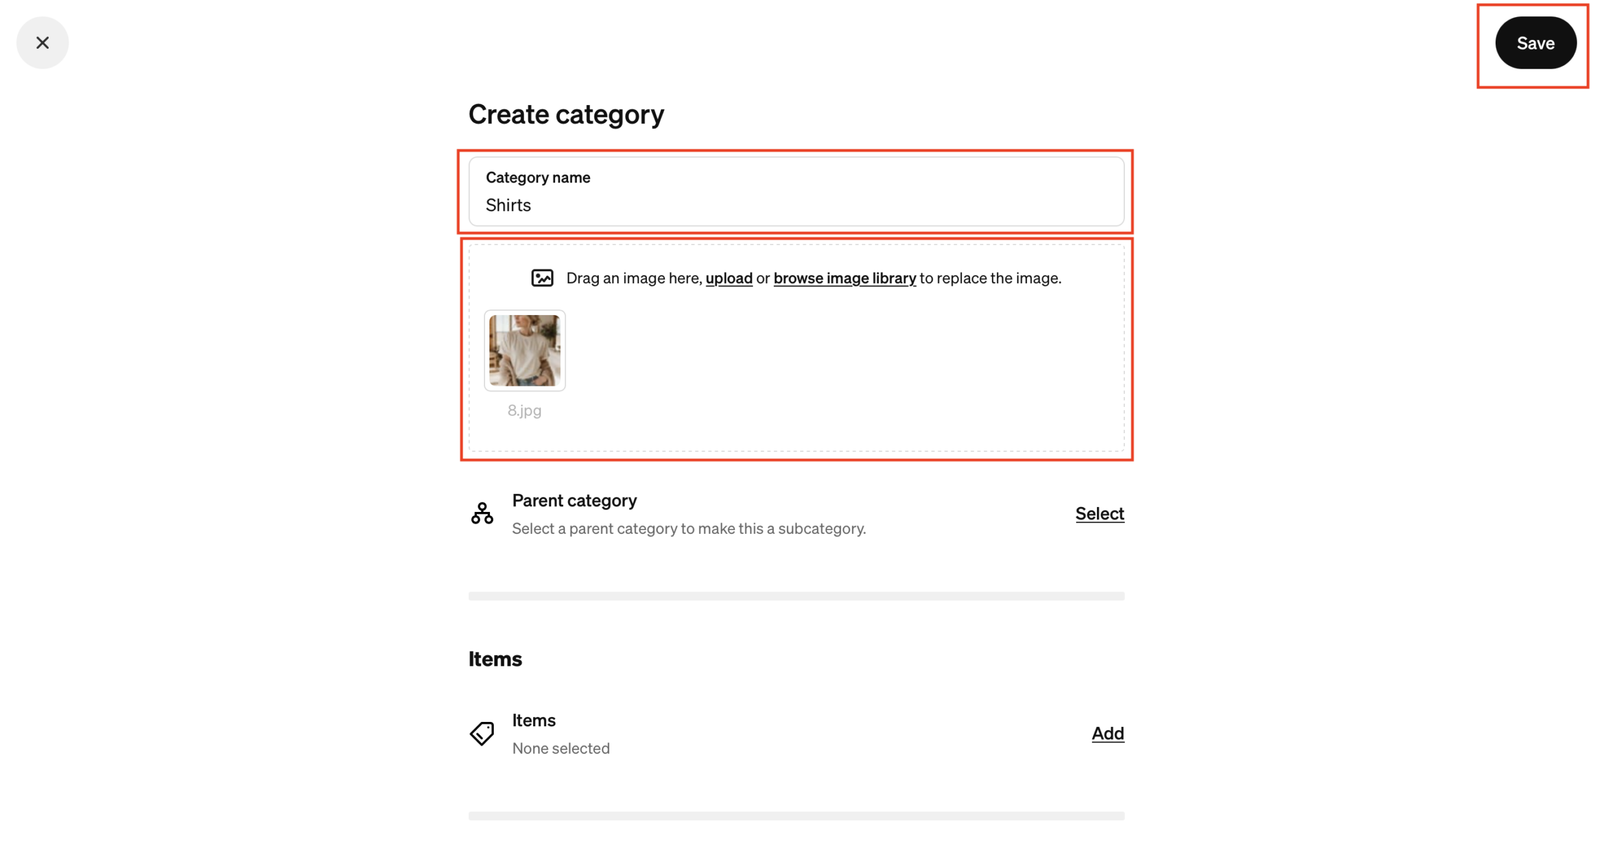
Your new category will show zero items. That’s expected, since there are no products yet. If you want more structure later, you can create a new category and pick Shirts as its Parent category to make it a subcategory, for example T-shirts, polos or long-sleeve shirts.
Step 2: Add your first product in Square
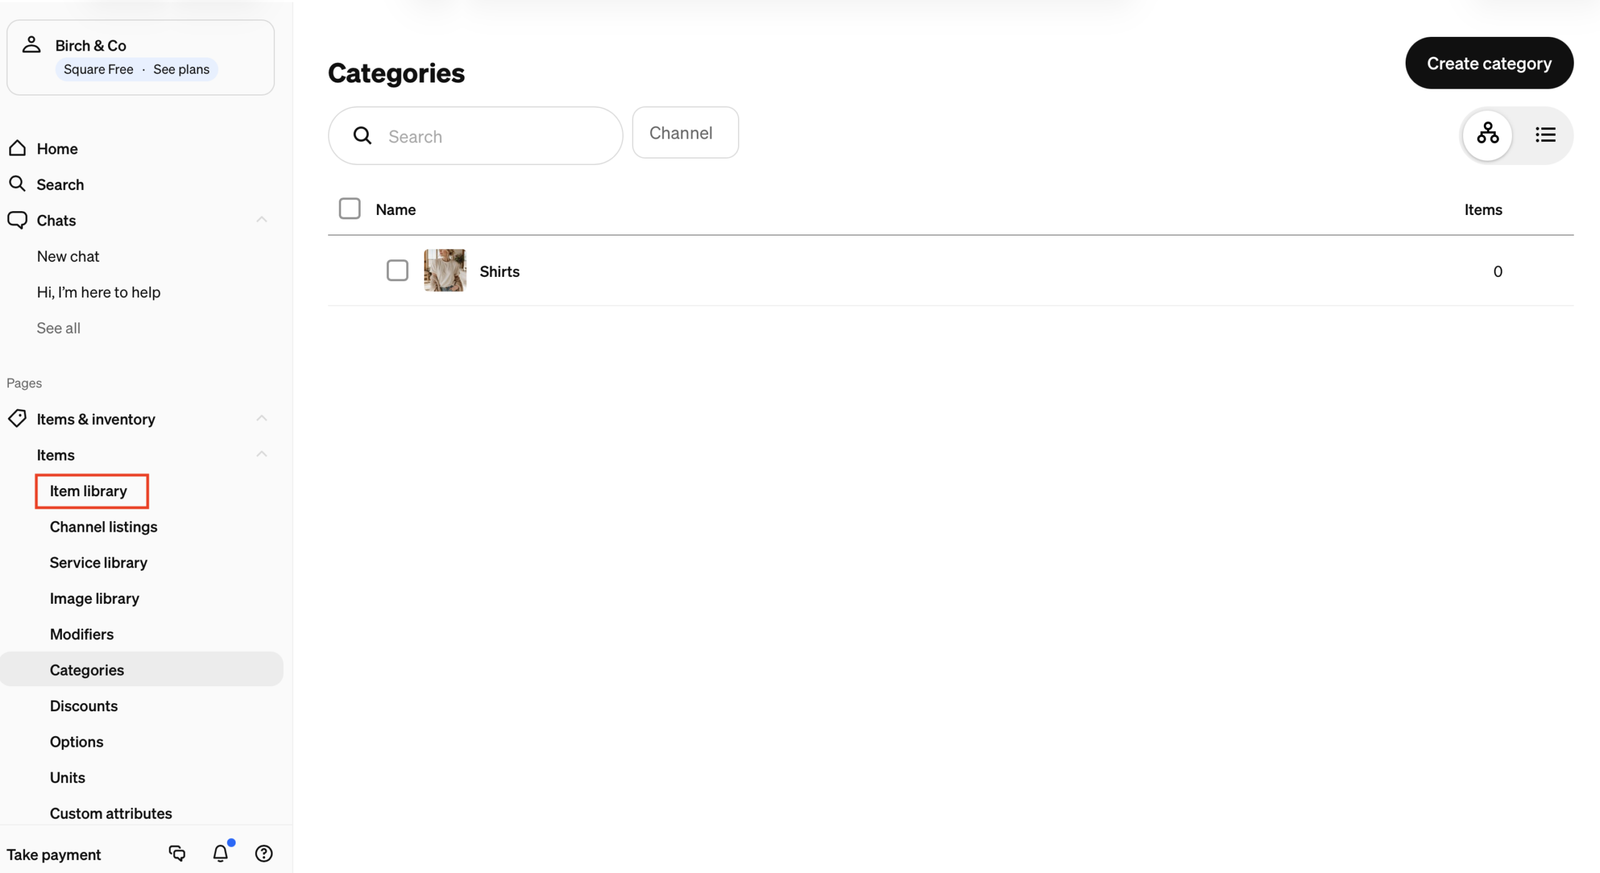
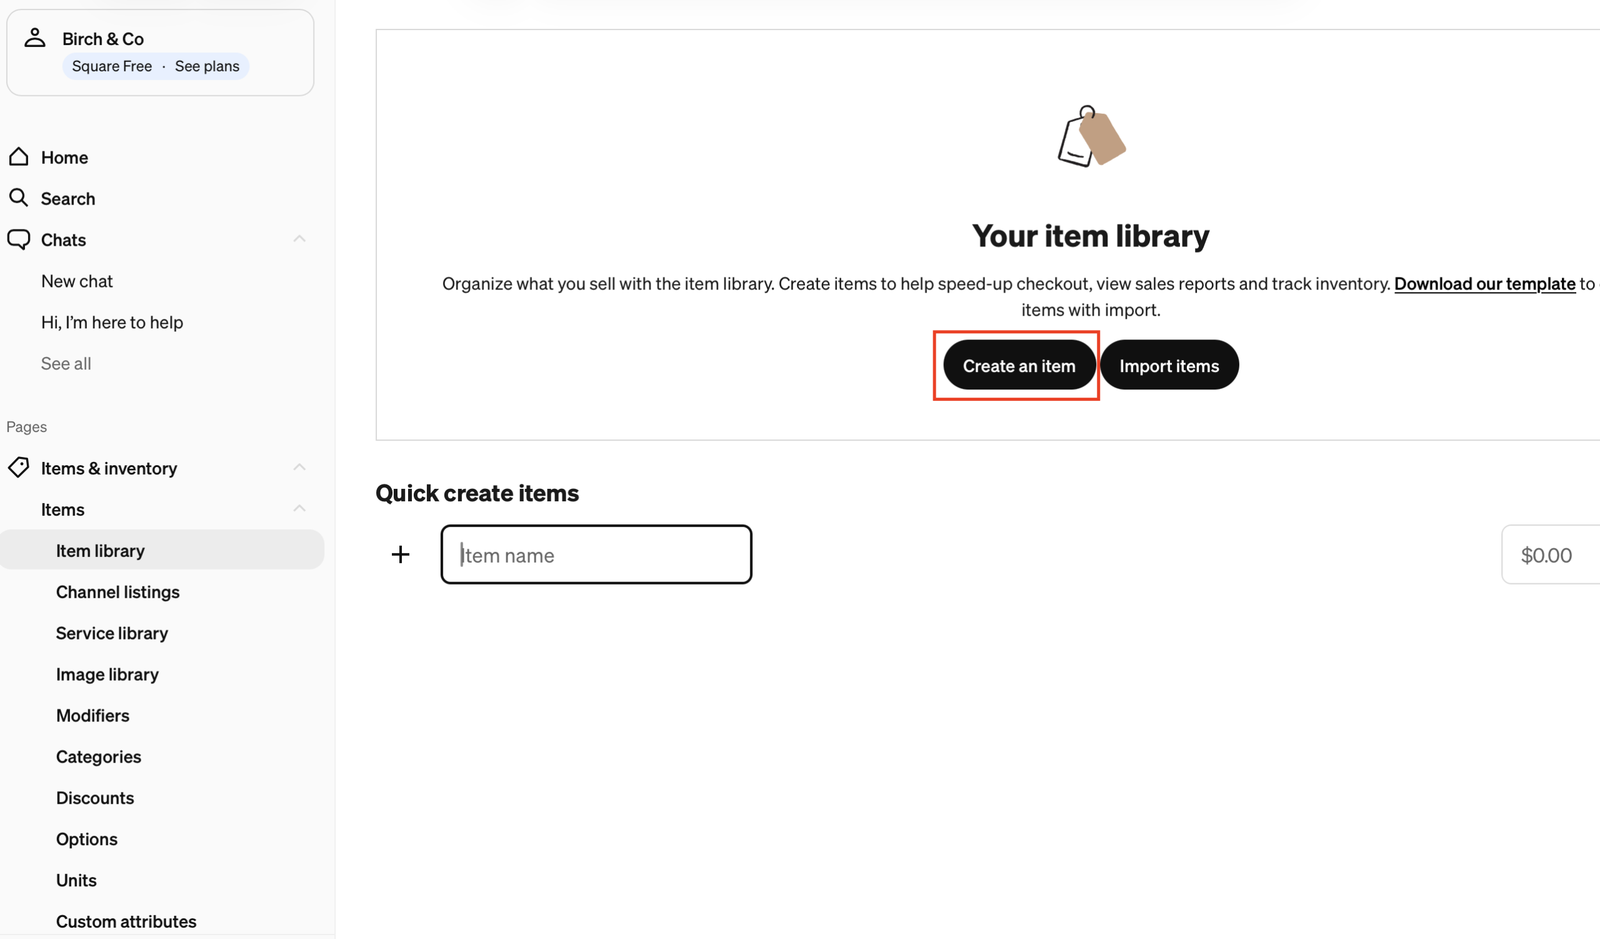
1. Go to the Item library and click Create an item to open the product editor.
2. Choose an item type. Square offers physical goods, digital downloads, event tickets, and food and beverages. For a clothing store, select Physical good and click Next.
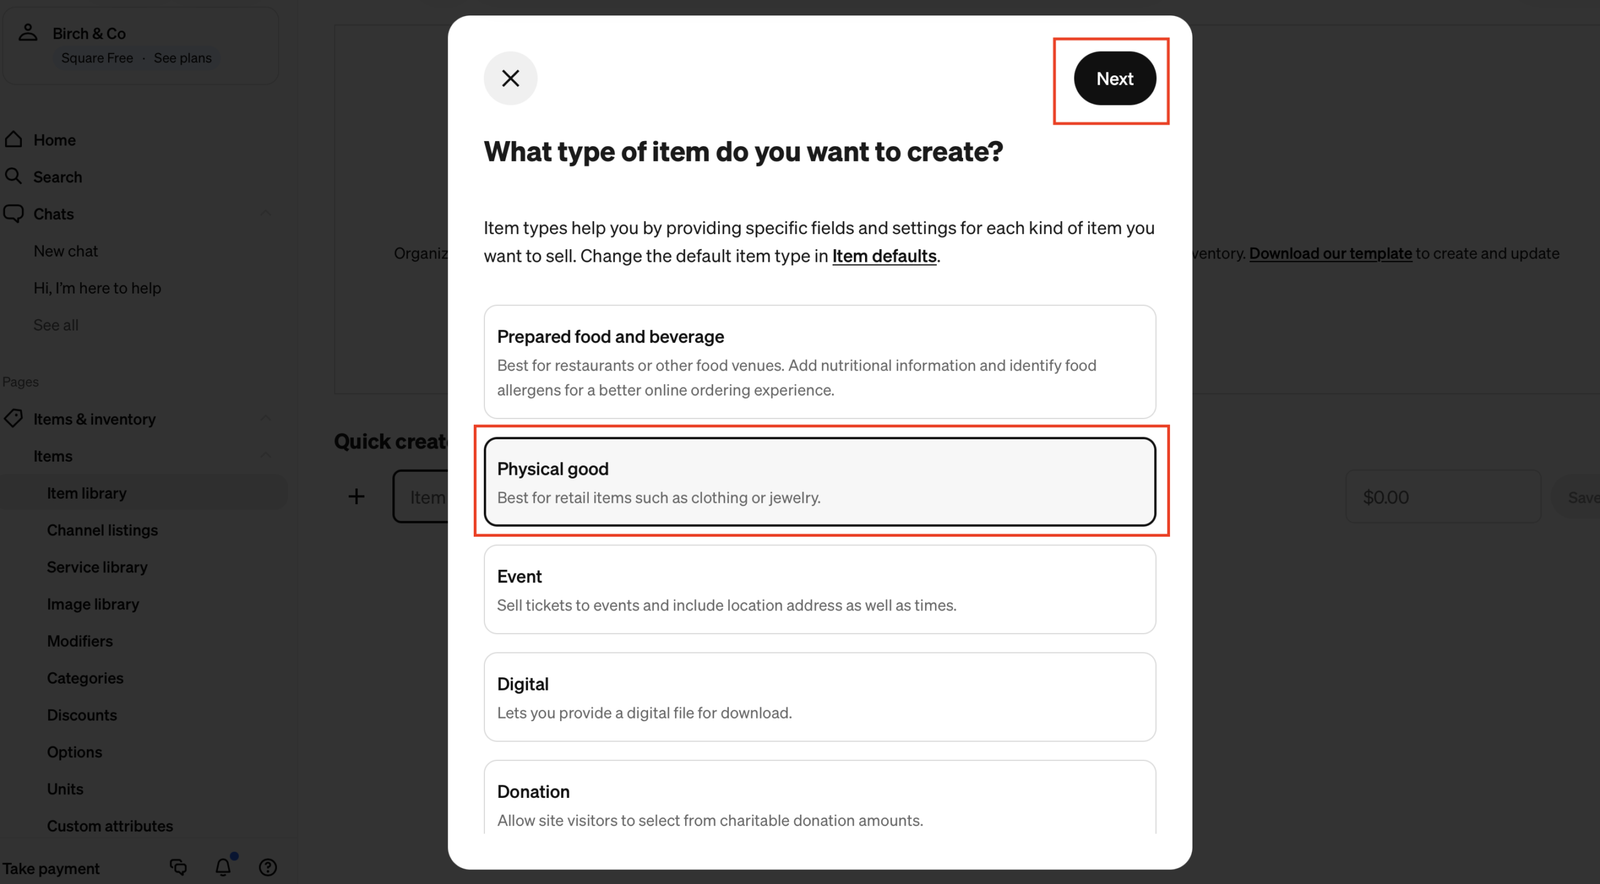
The Item library also has an option to import items. That’s useful if you already have a large catalog, but this guide builds the product from scratch.
Step 3: Enter product details and add Square Online as a sales channel
This is the most important screen in the process, so take your time here.
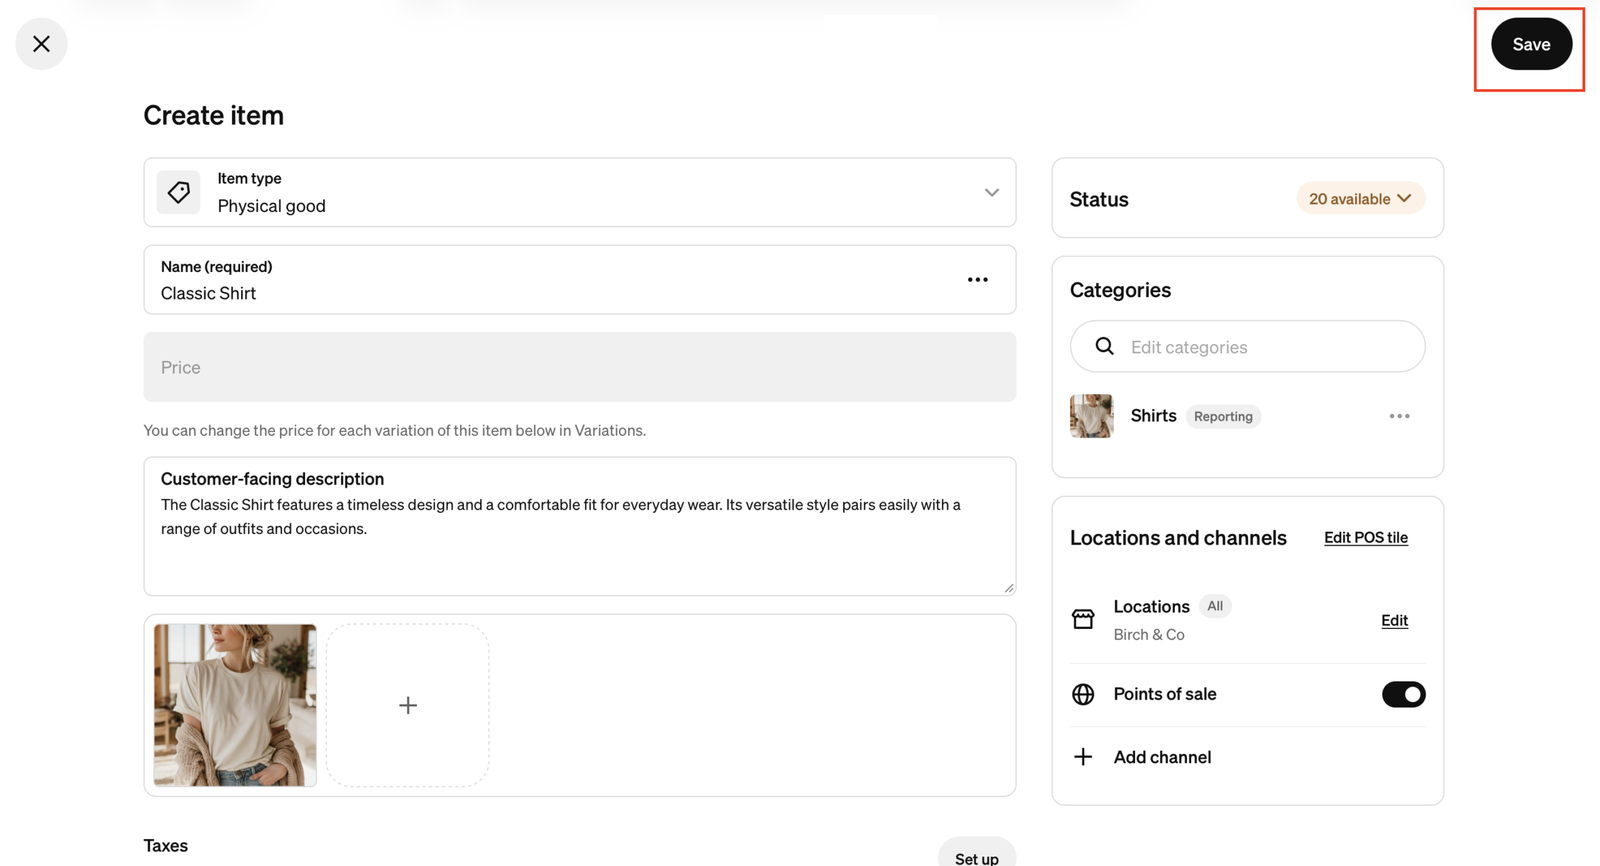
- Name and price. We’ll call the product Classic Shirt and set the price to $19.99.
- Description. Explain what you’re selling and give customers a reason to buy. Be specific: materials, fit, and anything else someone would want to know before purchasing.
- Photo. Use clear, high-quality images with consistent dimensions. Photos from different angles help.
- Category. Assign the product to the Shirts category you created in Step 1. It shows a Reporting tag, which marks the category Square uses in sales reports.
- Locations and channels. This controls where the item is sold. Points of sale is on by default, so to sell on your website, click Add channel and add Square Online. Without it, customers can’t buy the item online.
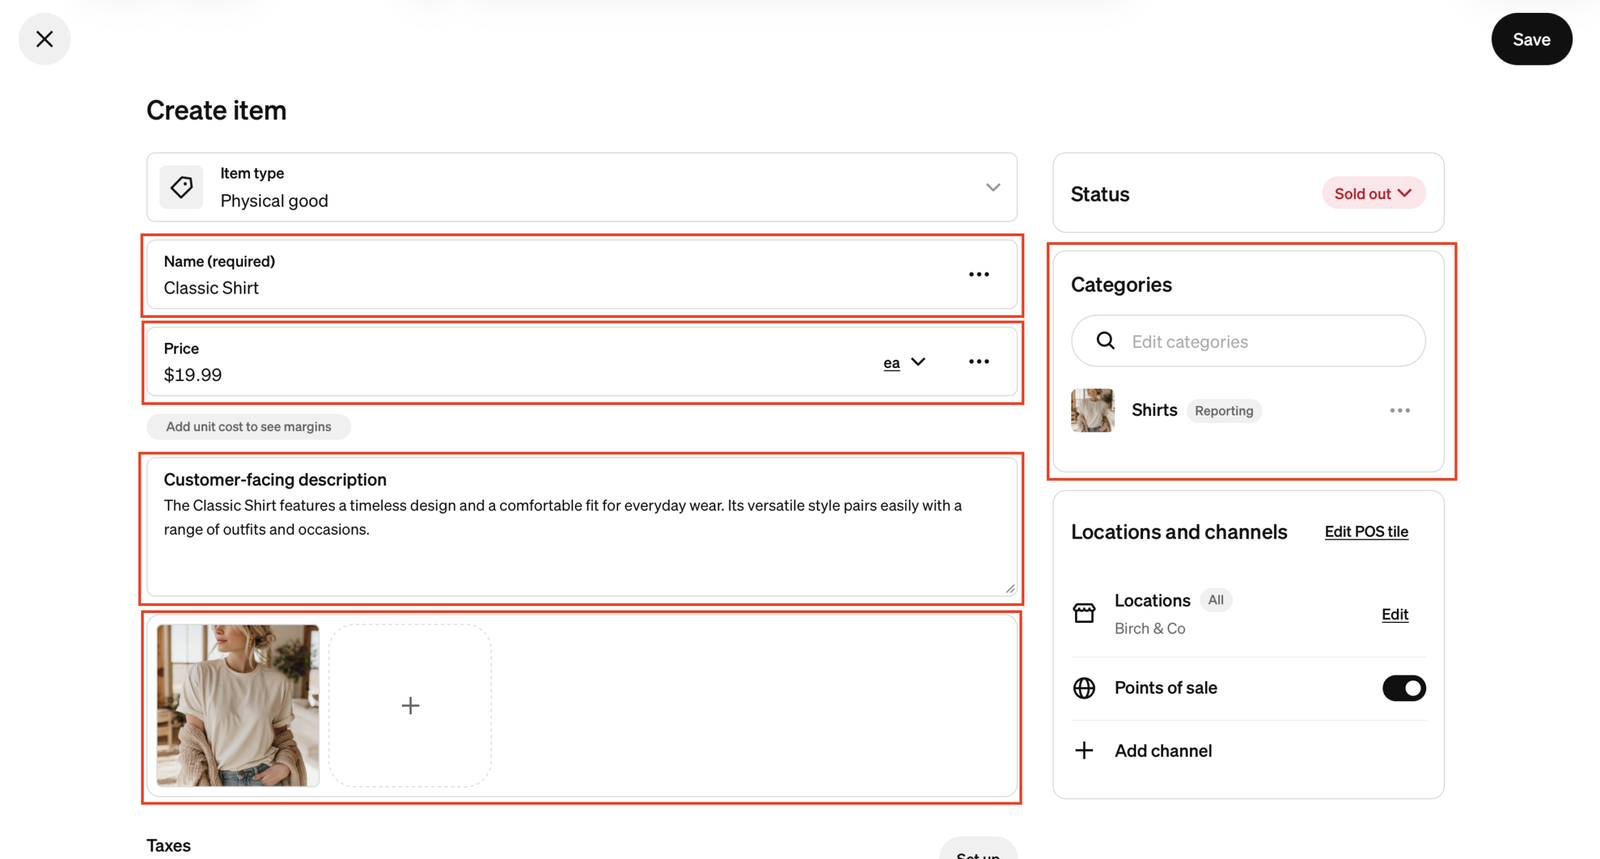
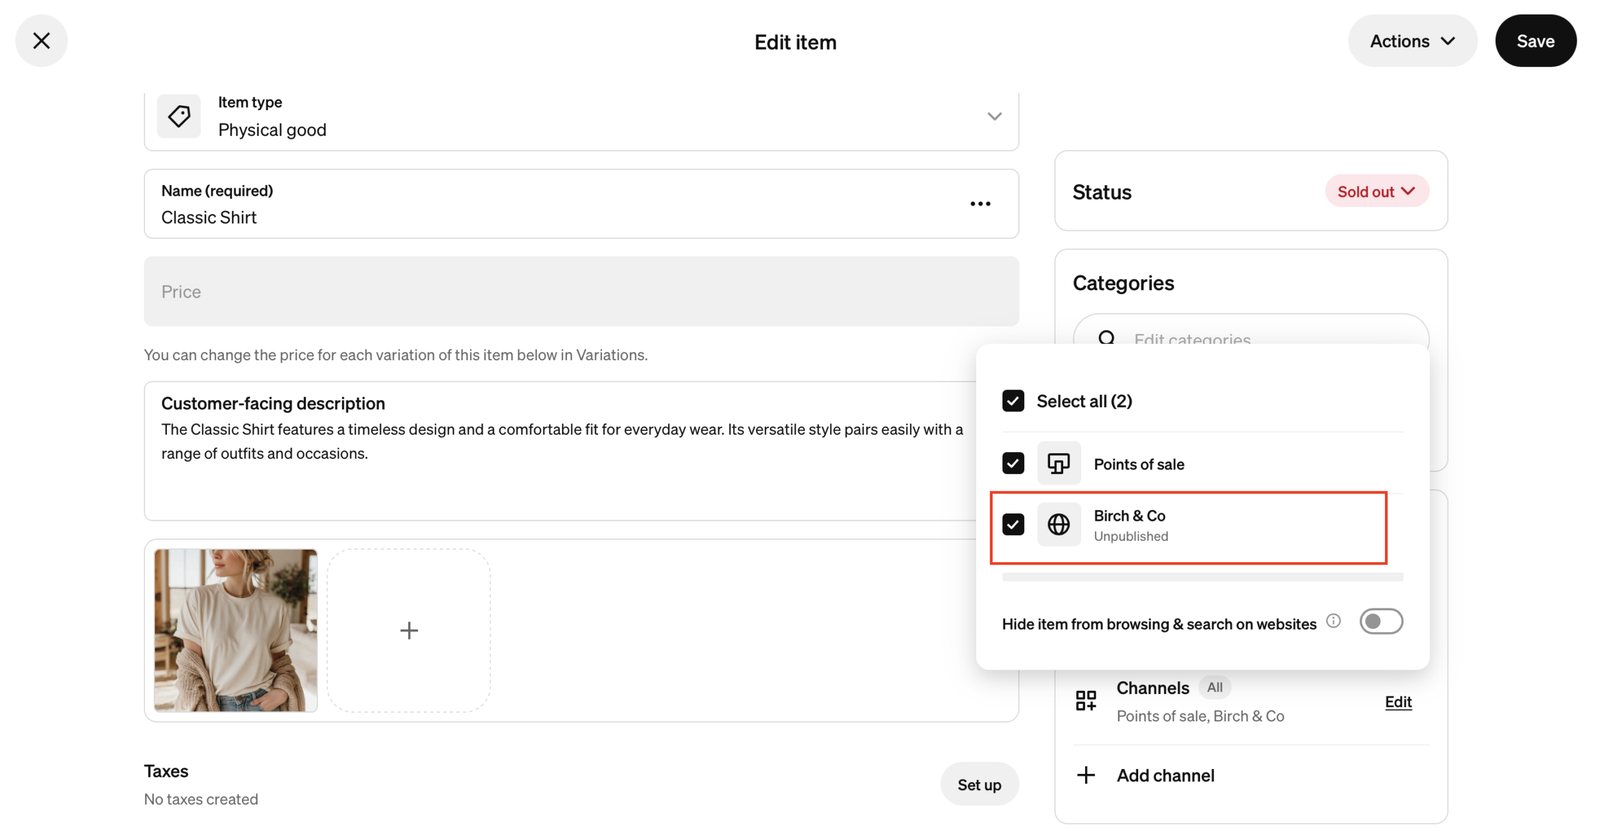
You’ll also see a Sold out status. Ignore it for now. It shows because no inventory has been entered yet, and we’ll fix that in Step 5.
Step 4: Set up sales tax for your Square items
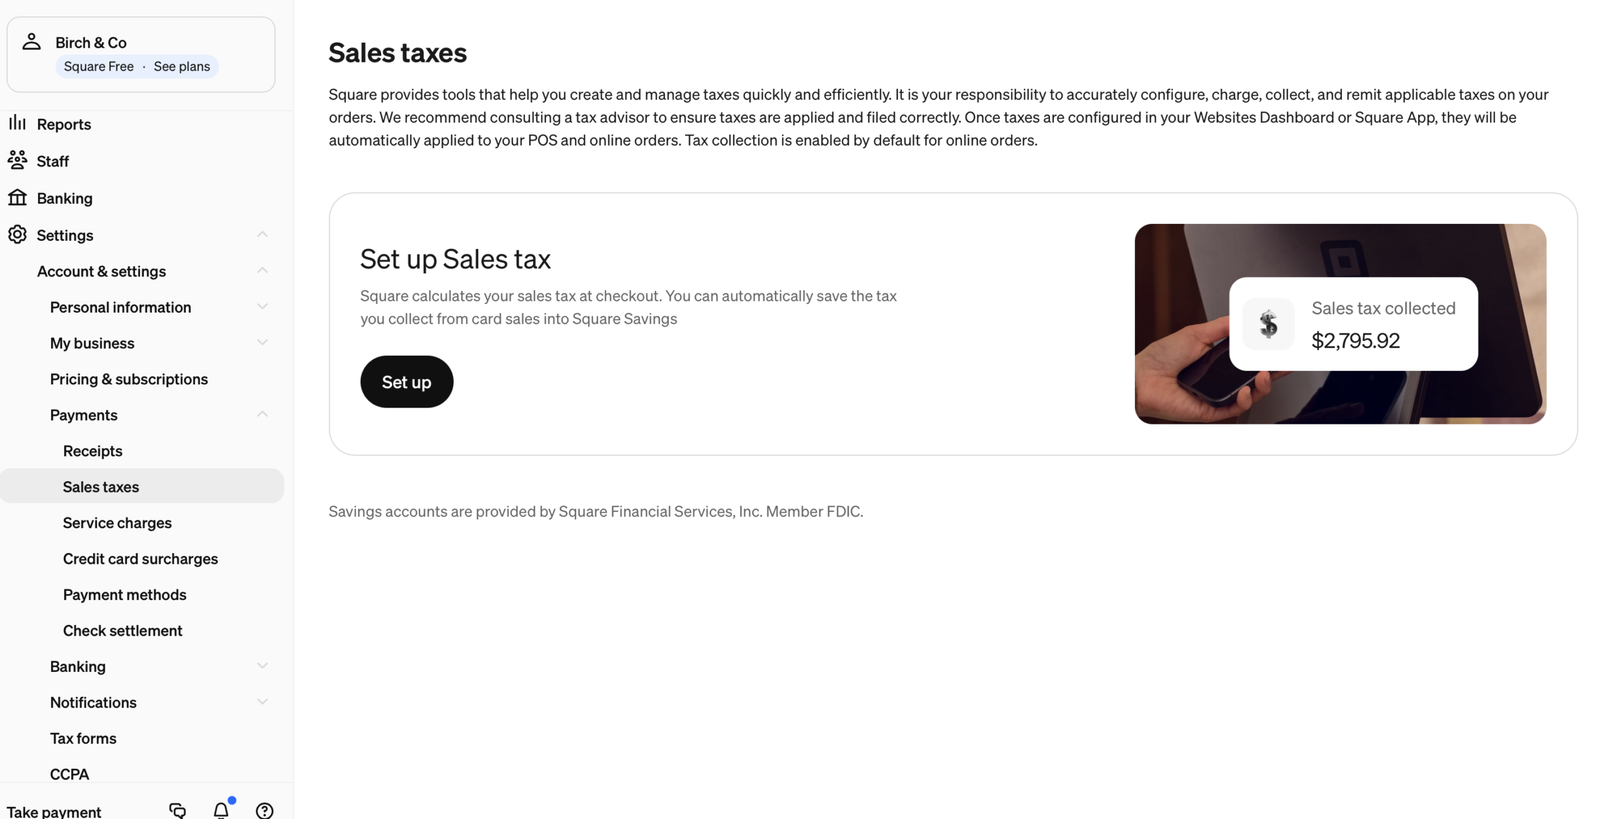
Depending on where your business operates and where you sell, you may need to collect sales tax. Scroll to the Taxes section of the product editor and click Set up. Square opens its sales tax settings, where you configure how tax is handled.
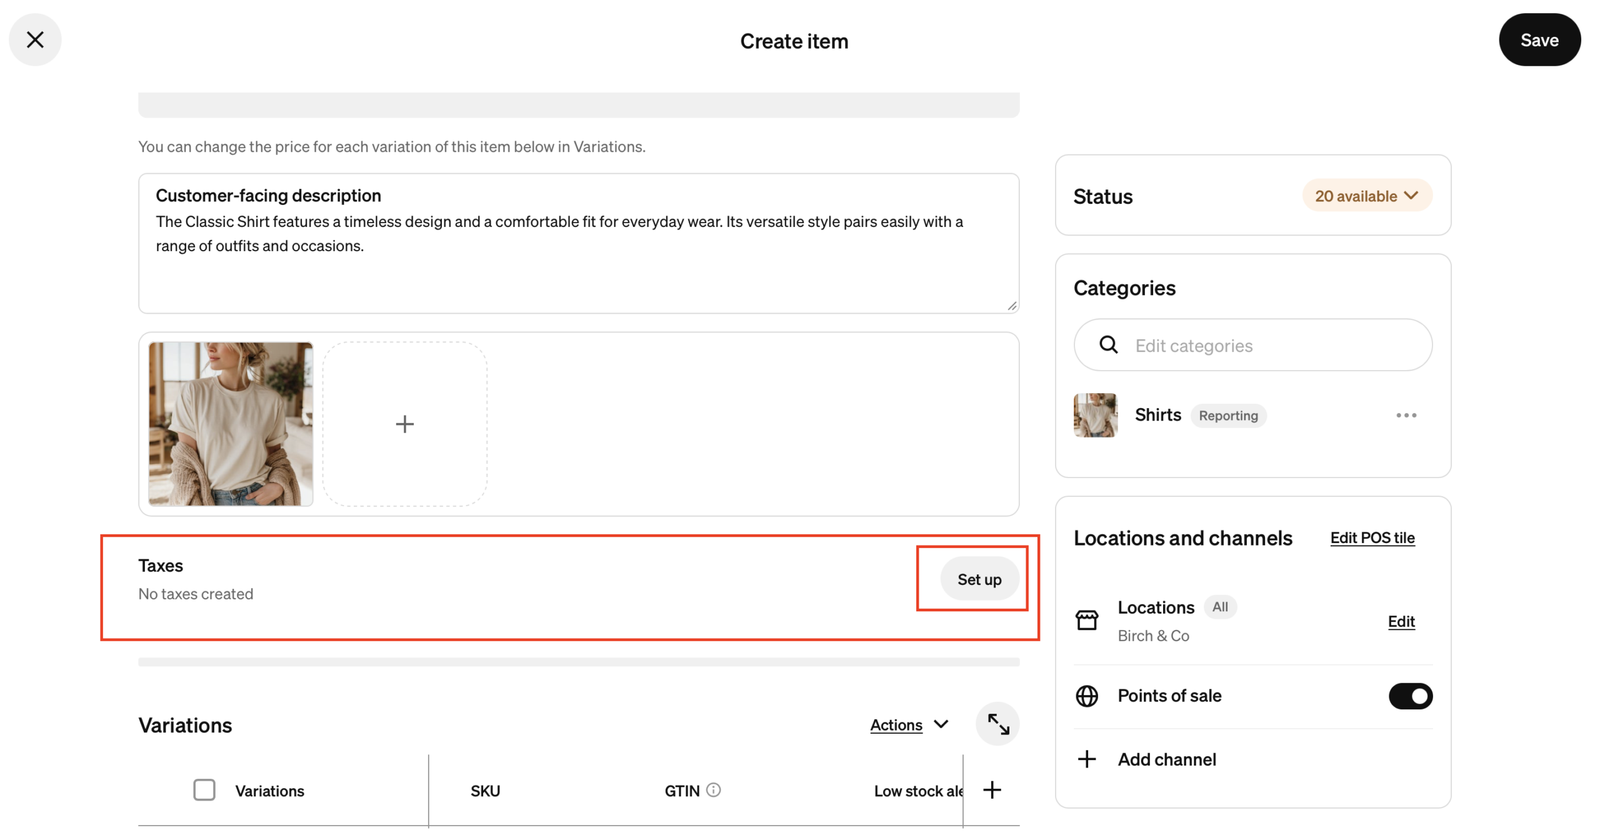
We’re not covering the full tax setup here, because the rules vary by business and location. Don’t skip it, though. Make sure taxes are configured correctly before you accept real orders. Square’s own page says tax setup is your responsibility and recommends consulting a tax advisor.
Step 5: Set inventory and low stock alerts in Square
The product shows as sold out because you haven’t told Square how many you have. Fix that first.
1. Click Sold out and choose the option to set your initial stock.
2. Enter your quantity. We’ll use 20 shirts, then click Done.
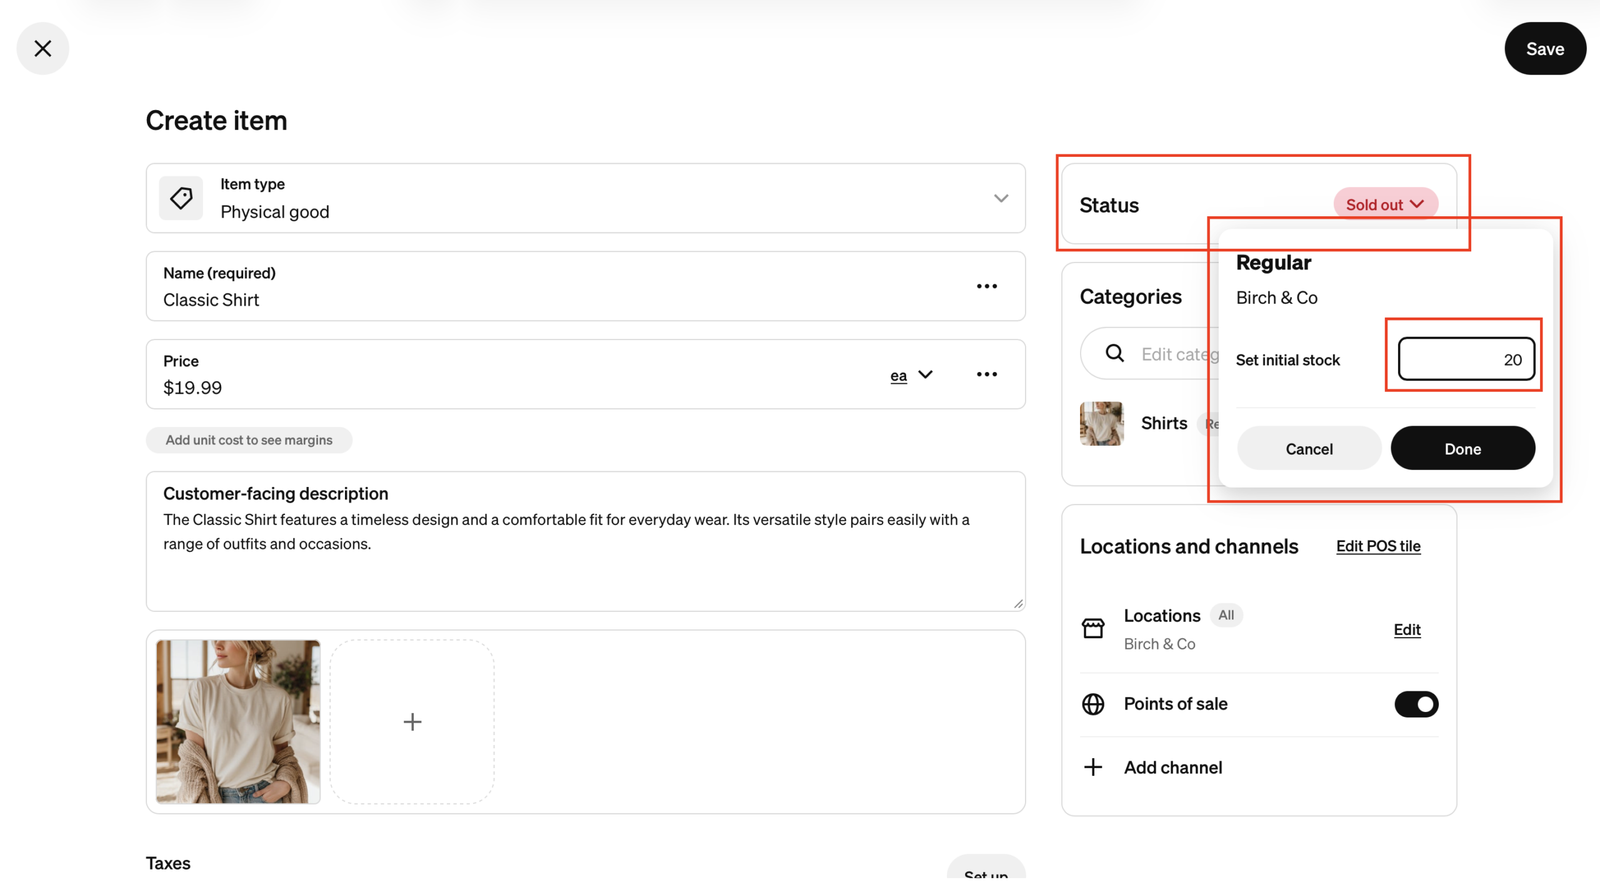
Square can now track stock as you make sales. Next, scroll to Manage inventory for a few more useful settings:
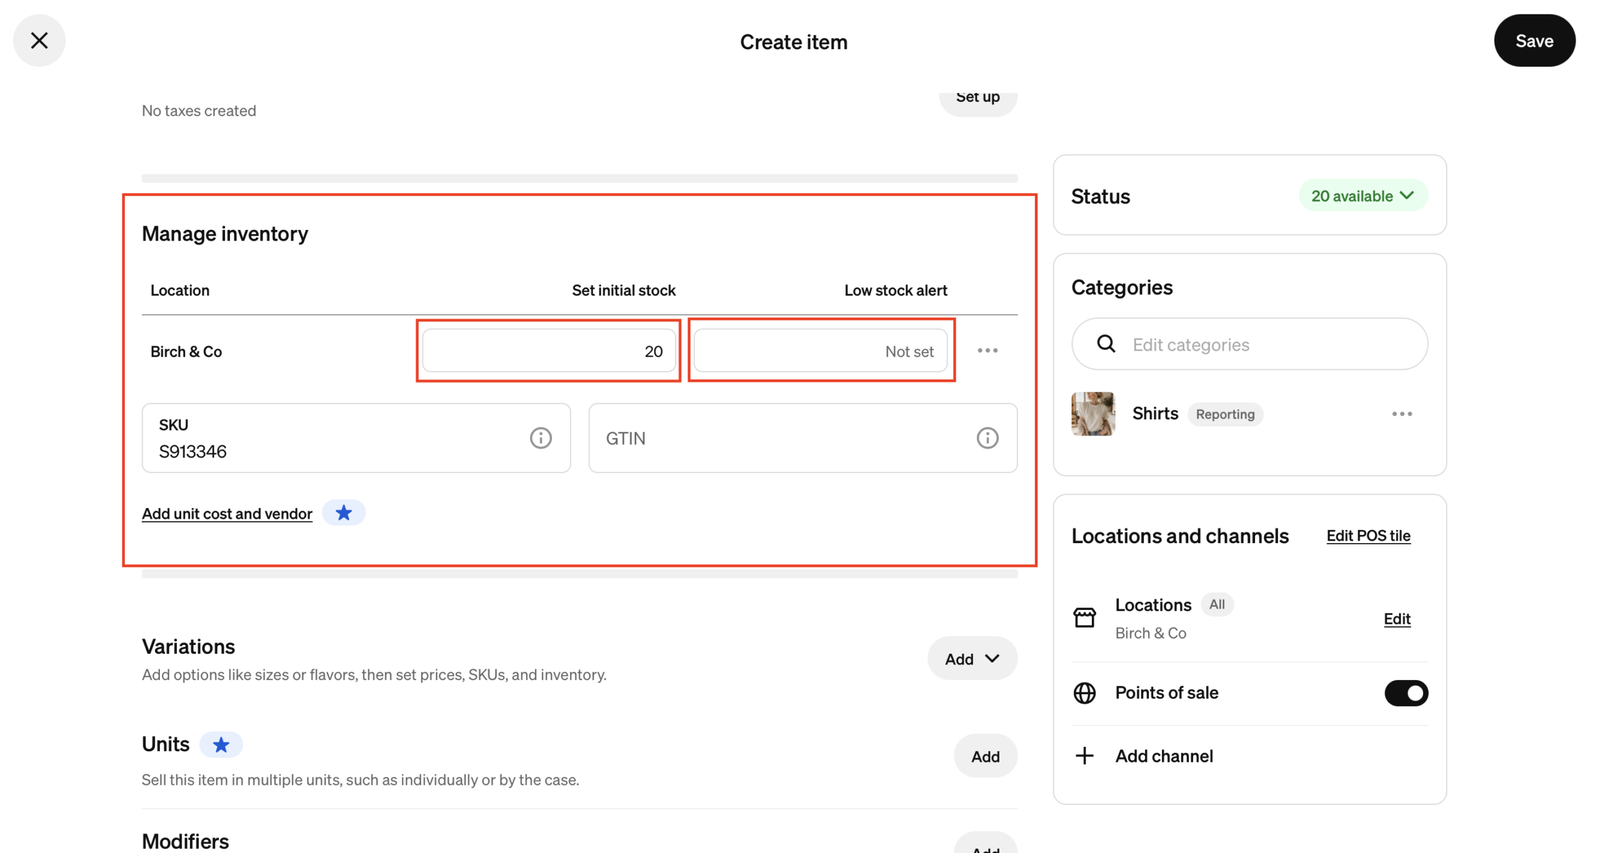
- Low stock alert. Set a threshold, such as 5, so you know when you’re close to running out.
- SKU. Short for Stock Keeping Unit, a unique code that identifies and tracks a product. If you sell different sizes or colors, each one should have its own SKU. That makes inventory much easier to manage. Square assigns a SKU automatically, and you can change it to your own.
- GTIN. A field for codes like UPC barcodes. If your products don’t have one, you can leave it blank.
Step 6: Add size variations to a Square product
If you sell the shirt in small, medium and large, don’t create three products. Add variations to the same item.
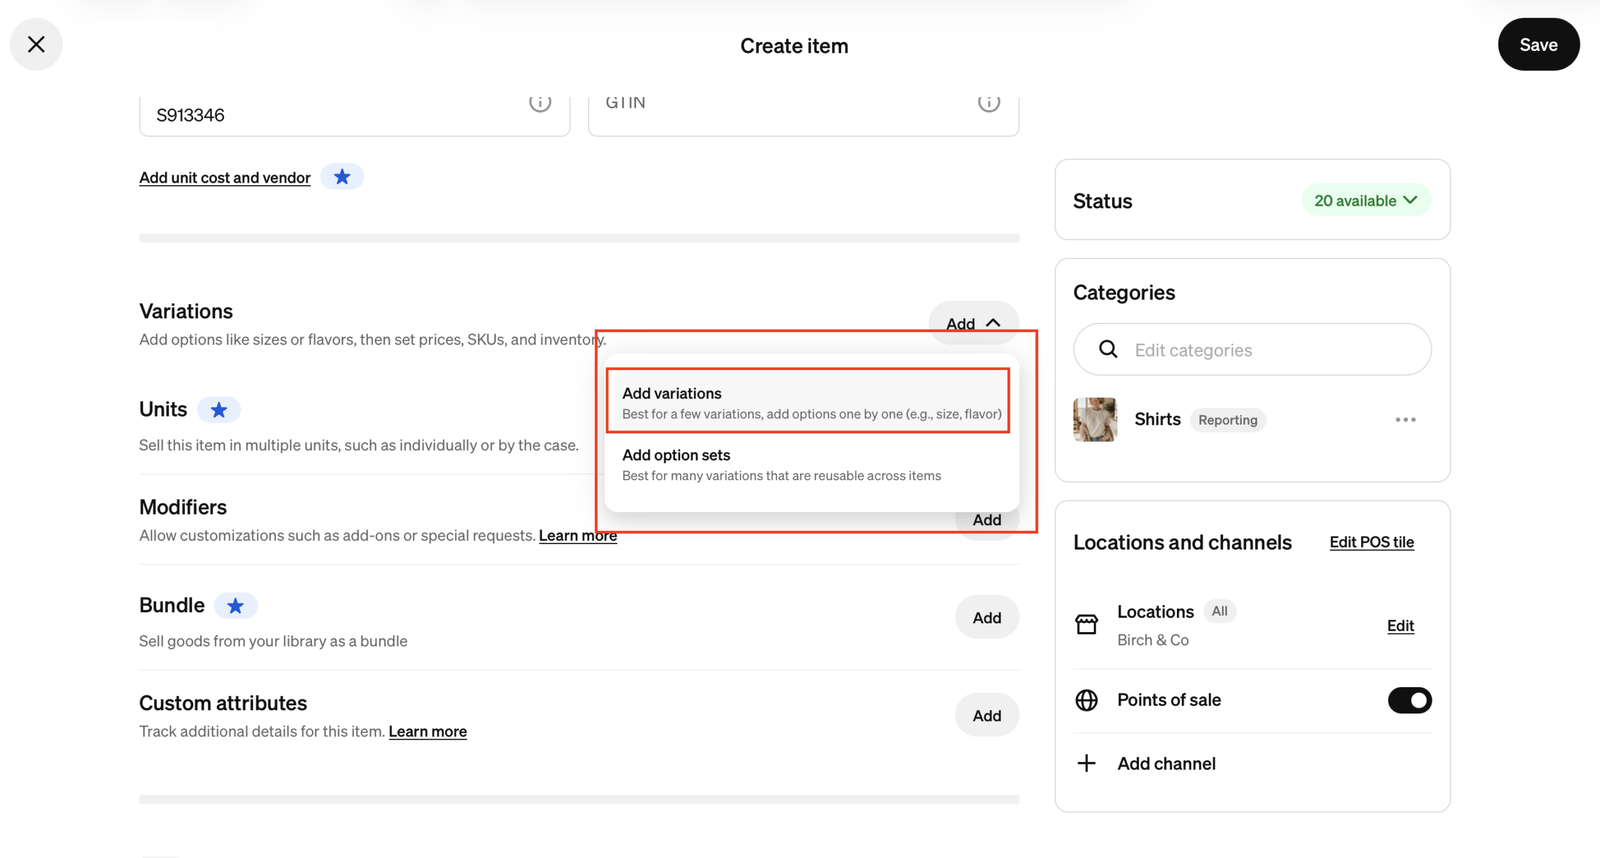
- Scroll to the Variations section and click Add. You’ll see other options here too, like units, modifiers, bundles and custom attributes. They’re worth exploring as your store grows, but we’ll skip them for now.
- Choose how to add variations. Add variations creates them for this one product. Add option sets is better when you want to reuse options, like sizes or colors, across several products. We’ll select Add variations.
- Square has already created one variation from your item. Rename it to Small, then click Add more to add Medium and Large, plus any other sizes you need.
- Fill in each variation’s settings, covered below, then click Done.
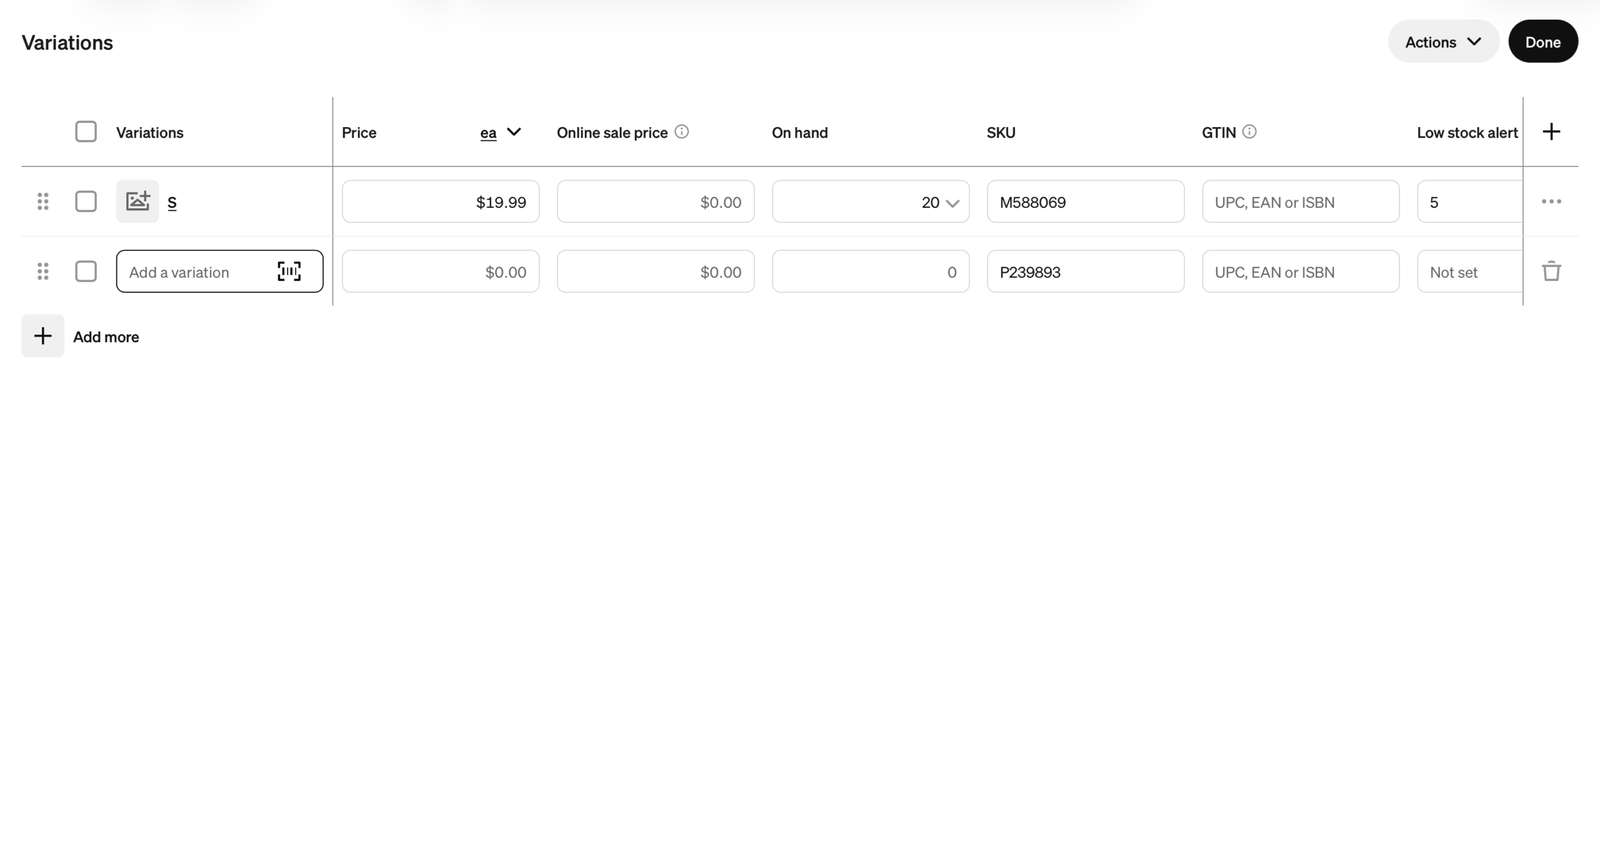
Each variation has its own settings:
- Price. If all sizes cost the same, set them all to $19.99. If a larger size costs more, give it its own price.
- Online sale price. Use this to run a promotion without changing the regular price.
- Inventory. Track each size separately, so when someone buys a medium, Square updates the stock for that variation only.
- SKU. Square assigns a SKU to each size automatically. You can keep it or change it.
- GTIN. Each size can have its own GTIN, such as a UPC barcode. Leave it blank if you don’t have one.
- Low stock alert. Set a threshold per size, so you know when that size is running low.
- Shipping weight. Each size can also have its own shipping weight.
- Discount eligibility (beta). Each size also has a discount eligibility setting. It’s currently in beta.
Watch the stock numbers. Square puts the 20 you entered in Step 5 on the first variation, so right after you add the sizes you’ll see Small 20, Medium 0 and Large 0. Split the stock across the sizes yourself.
Here is the example setup after splitting the 20 shirts across sizes:
| Variation | Price | Starting stock |
|---|---|---|
| Small | $19.99 | 5 |
| Medium | $19.99 | 8 |
| Large | $19.99 | 7 |
Step 7: Review and save your product
Before you save, check the product name, description, images, category, prices and variations. Confirm your inventory quantities, and make sure the product is assigned to the sales channels where you want to sell it.
When everything looks right, click Save in the top-right corner. Your Classic Shirt now appears in the Item library with its image, the Shirts category, a starting price and inventory information. You can come back any time to update prices, add variations, change descriptions or manage stock.
What’s next
You now know how to create categories, add products, set up inventory and manage different sizes and prices in Square. If you’d rather have someone set this up for you, get in touch and we’ll help you get your Square store ready to sell.
